With our New Menu Management, availabilities are no longer defined by menu, but rather by each specific item. Learn more below!
To set up Menu Times, you will now need to create different Menu "Availabilities". These availabilities are simply a schedule for when something can be active on your menu. As an example, you could have a Lunch Availability and a Dinner Availability. When creating new Menu Items, you then select which availability it should fall under. To get started, follow the steps below.
Creating & Editing Availabilities
-
Log in at pos.tableneeds.net, or log into the Table Needs app!
-
Navigate to the "Menu Admin" section, by clicking the "Menu Icon" that's located on the left side of the screen.
-
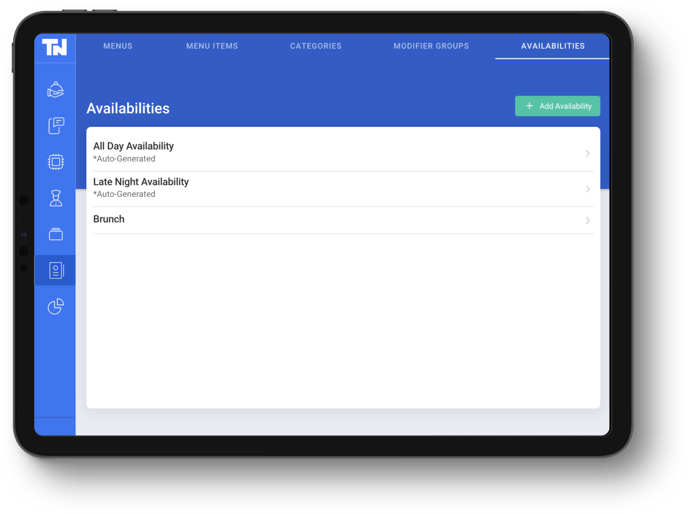
Click on the "Availabilities" tab, located at the top of the screen.
-
From this page, you can edit your existing Availabilities by clicking on them or create new ones by selecting the green "Add Availability" button.
-
When editing or adding an availability, you will be presented with a page that allows you to name the availability and has each day of the week listed. By clicking the plus "+" icon to the right of the day, you can create availability for that day.
-
Once adding an availability, you will see the time displayed directly on that day. You can edit or delete that availability by clicking on the three "dots" next to the time. You can also add multiple timeframes that you want availability, within a single day!
-
Make sure to click the blue "Save" button at the top right when you're done!
Adding Availabilities to a Menu Item
-
Log in at pos.tableneeds.net, or log into the Table Needs app!
-
Navigate to the "Menu Admin" section, by clicking the "Menu Icon" that's located on the left side of the screen.
-
Click on the "Menu Items" tab, located at the top of the screen.
-
From here, find the desired menu item and click on it. You will then be presented with the "Edit Item" page.
-
Scroll down to the "Menu Details" section. You will see an "Availabilities" portion at the top of this section, that shows all of the different menu availabilities that you have created. Simply check the box for each availability that you would like applied to your item!
-
Click the blue "Save" button at the top when you are finished! Don't forget to publish your menu for it to become active for your guests!
Note: All items will be displayed on your menu regardless of the current availability. However, items that are not available based on your set schedule will appear greyed out. You still have the ability to "Disable" items from your Menu Items page.
Thinking about creating a new menu for your guests! Check out our tutorial here!